Painting Luminous Trees

I recently received a question on how I painted some trees in the painting you see below. So I thought I would walk through this painting to illustrate how I went about getting the luminous quality of the backlit tree which is the focal point.

Autumn_Serenity

To start with, since the whole purpose of the painting was to capture that moment when light hits this group of trees creating a backlit glow, I thought about how best to capture that effect using paint. The three things I knew would help in this were the concept of simultaneous contrast (the effects of two colors next to each other), contrast (light and dark) and saturation.

But before working out those details I knew I wanted to start with a colored ground for my canvas, using a color that would enhance the vividness of the orange tree. So I chose to cover my canvas with a combination of Cadmium Red Light and Burnet Umber. I could have chosen to use Yellow Ochre, but I wanted the red ground to add some energy to the hills and greens so I went with this choice. I knew the orange/yellows on top would pick up some of the undying redness and energy of the ground anywhere it peaked through and would maintain its brightness on top of it. Continue reading “Painting Luminous Trees”

Bluebirds & Dogwood (in 12 steps)

Here is a breakdown of how I approached my latest painting. The painting itself was a request, and for guidance I had an idea of the color palette and that it should be calming. I also knew it should be fairly large, and in landscape orientation. So I first drew a number of sketches, to get a general idea of the composition. Then it was time to paint. I chose a 15″ x 30″ canvas and paint the edges (1 1/4 inch deep)

Step 1: Blocking in the background.
For the background the initial step was just to get color on the canvas. You can see in the photo below that first I blocked in a lot of color in the general color family I wanted for the final result, but without worrying at all how it looked. The photo below shows the end of that block in and the start of step 2.

bluebirds-step1
Step 1: Background Block-In


Step 2: Working the background for atmospheric effect.
For this step I worked with the same color palette I used for the blocking in of the background, but now started applying final color in blotches using a 1″semi-soft synthetic brush that let me blend the splotches as I went. As I worked I would adjust the colors, lighten some areas, and go back over areas to soften or adjust the colors and values. I kept my sketch handy to inform me where I would be putting elements on the canvas so that the background would compliment the focal points. I keep the corners darker and light in the center to draw attention to the middle of the painting and keep attention from leaving at the edges. Continue reading “Bluebirds & Dogwood (in 12 steps)”

Plein Air – Redux

Last week I posted about painting “en plein air”, in anticipation of this weekend’s Jericho Plein Air Festival. I returned to the same spot as last weekend. The idea was to see how I do painting the same scene – learning from the first effort and trying to improve.

The festival brought in 75 artists, watercolorists, oil painters, and those using acrylics like me. After an early morning gathering for food and coffee and a group meeting we all headed off to our preferred spots. There were a couple dozen options for painting and only 3 of us ended up at the Beaver Pond in the morning to paint. The weather was beautiful, but there was no shade so by late morning it was pretty hot in the sun. At the end of the day, returning to the gallery to frame our work, we had Ben & Jerry’s ice cream waiting, the perfect ending to a hot day.

I spent a couple hours painting the same scene I painted last week. And overall I feel like I did make a number of improvements, and this painting is much stronger than my first attempt.  The great thing about this festival is each person gets to hang one painting from the day at the Gruppe Gallery in Jericho. Its a nice touch to the event being able to go see everyone’s work and for others, and the public, to see yours.

Below is the painting I did today. One of 2 paintings actually, I did another small painting in the afternoon as well but it was a quick small painting.

Continue reading “Plein Air – Redux”

Taking the “en plein air” plunge

I’ve done it. I’ve taken to painting outdoors, with all its pitfalls and rewards. So I thought I’d share my experience as it evolves.

Painting “en plien air” (or “in the open air”) has a long history, most notably being the method preferred by the impressionists. It has its challenges and its rewards. This summer I have taken the “plien air” plunge and decided to give this method of painting a run. Early results are not so good, but I’m determined to stick with it and see where it takes me.

A little history. Prior to the mid-19th century it was difficult to paint out of doors with all the equipment necessary, but the introduction of paint in tubes and the box easel (portable) made it much easier to carry paint and equipment with you outside to paint on-site. This dovetailed nicely with the rise of impressionists like Monet, Pissaro and Renoir who believed in capturing real-life and “painting the light” outdoors. I won’t bore you with more history other than to say painting “en plein air” became very important to impressionist painting and changed how the world looked at art.

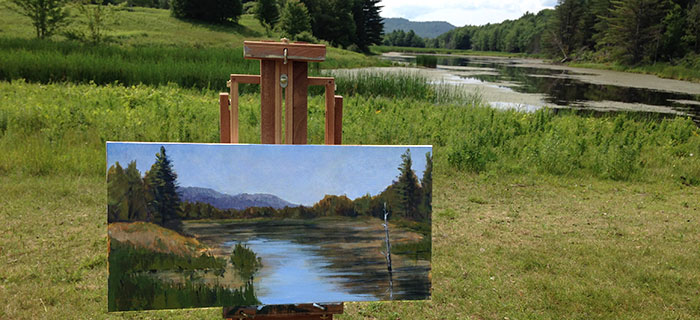
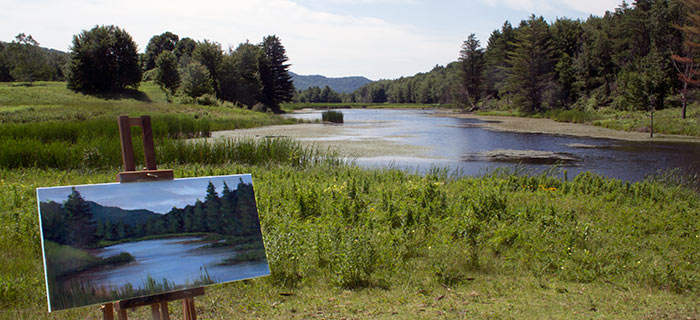
For me, the attraction of painting outdoors is that you truly can not capture a scene with a camera or memory, or the light and the colors, as well as when you are standing there at your easel looking at your subject. Being outdoors by itself is great, most of the time. And there is something romantic about painting a picture all in one session right there on the spot. Its not necessary to complete a painting in one session, Monet famously would take several canvases with him and paint on each for only a few minutes at the same time of day, returning each day so as to capture that exact light and time of day. But it is common practice for many to paint in a single session. And there are plenty of very accomplished and successful artists who will only paint this way, outdoors, rain, shine, summer or winter.

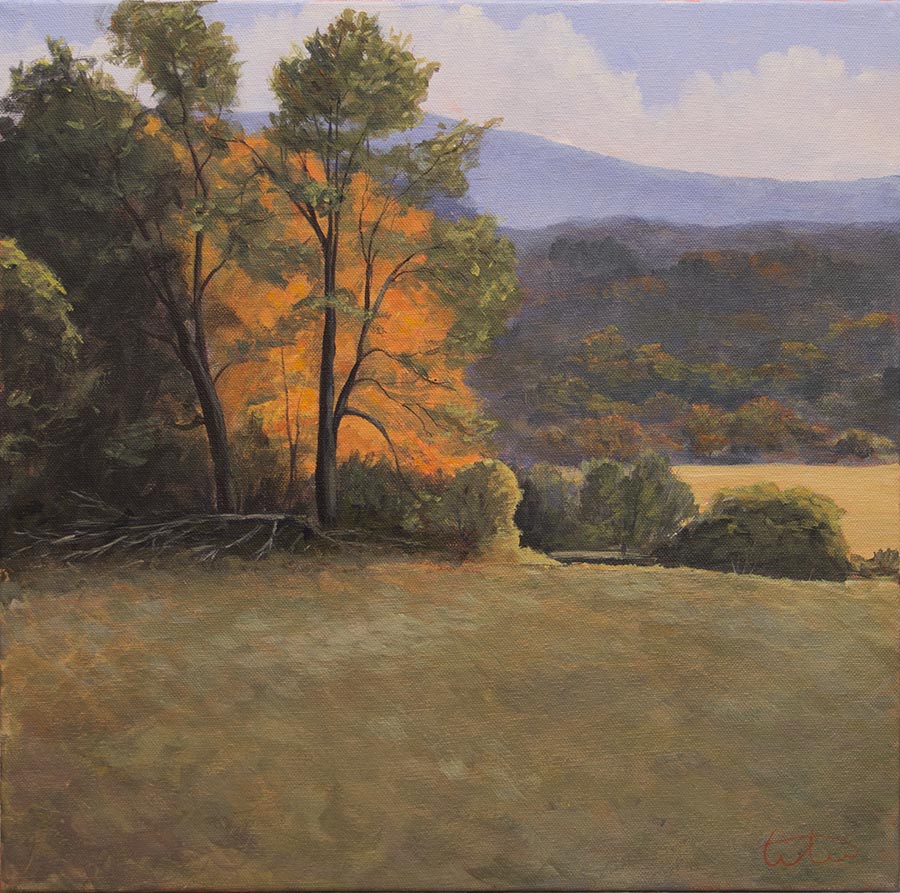
So I have painted this way now a total of 5 times. The results of which are 5 paintings that are not worth displaying. But I’ll share this last effort and what I have been learning for a couple of reasons. One, its worth showing and talking about the challenges as a learning tool. Two, it will be good to gauge my progress as I paint outdoors more and more. And three, since I will be participating in two “plein air” festivals in the coming weeks, and taking a weekend workshop in August which will be mostly outdoor painting, its good to think about the experience so far and plan for what I need to improve on.

Continue reading “Taking the “en plein air” plunge”

The Value of Workshops

Last Saturday I attended a 4 hour workshop by artist Aline Ordman a really wonderful landscape painter (website here) and we were instructed to bring something to paint (photos mostly, since we were confined indoors due to weather). So I took my most recent painting, Waitsfield Farm, because I was not fully satisfied with how it turned out. My hope was to re-paint the same landscape with what I hoped to learn and see if it came out better/

Aline gave a 1-hour demo in which she painted a quick landscape and provided commentary on what she was doing and why. Here is the painting she completed (in oils) in just 1 hour

Painting Demo by Aline Ordman

Here is what I learned from her, before I get to my own efforts:

Follow the 4 “S”s. Squint, Simplify, Stand Back, Stop.

  • Squint to see your value shapes and big color areas.
  • Simplify your subject to only what is necessary.
  • Stand back, often. Keep stepping back to look at your work in progress. You need that moment to see it in new light and take a breather.
  • Stop. Know when you are done! Don’t keep tinkering. (I wrote a blog post about this some time ago).

Her approach to putting paint on the canvas is: 1-stroke, reload. 1-stroke, reload. Repeat. This way she keeps her colors clean, wiping her brush not necessarily after every stroke but very often.

Use a BIG brush and put down BIG swaths of color. She teaches that if you want to loosen up and get more freedom in your brush strokes, you need to use your biggest brushes. Start with big swaths of color, no need for a lot of color variation as you start, that can be added later, but get that canvas covered using a big brush so you can’t be tempted to get picky with detail. Continue reading “The Value of Workshops”